浏览器自动化允许您在VMLogin的浏览器配置文件中自动执行任务。从创建简单的自动化脚本到复杂的Web爬虫,可以搜索、收集Web数据并与之交互。
VMLogin浏览器自动化基于Selenium WebDriver。
通常情况下,如果您运行Selenium代码,首先将连接到Chrome驱动,然后设置您所需要的功能。而将VMLogin与Selenium代码结合使用时,您无需这样操作。您将使用Web Driver程序,通过本地端口连接到Vmlogin应用或某浏览器配置文件,设置所需功能,在预定义的浏览器配置文件中执行Selenium命令。
1. 支持的语言
Selenium框架提供了多种可搭配使用的语言,因此VMLogin自动化也可以在多种编码语言上运行。但是目前,我们仅为Java和Python供技术支持。
2. 在Vmlogin中使用Selenium
定义VMLogin端口:您需要提前定义软件端口以使用Selenium自动化,如图
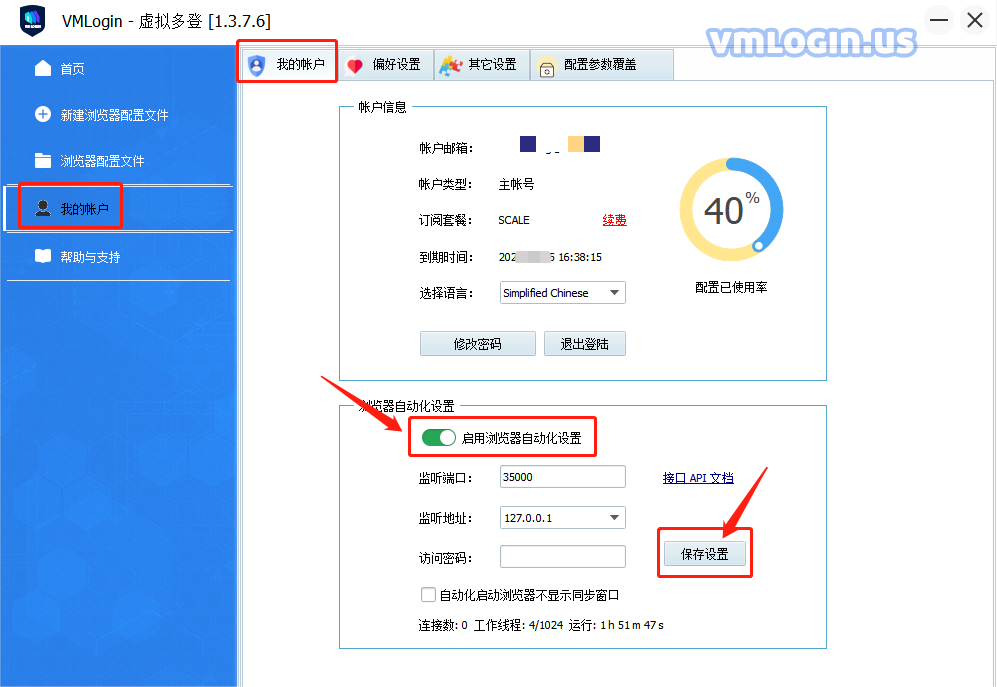
在软件“我的帐户”中打开启用浏览器自动化设置,并在监听端口中设置能使用端口,这里默认是35000,另外你也可以设置一个访问密码。
随后,您就可以通过定义的端口连接到VMLogin了。
接口还可以传入代理服务器信息,如果传入代理信息会覆盖配置文件里的代理信息,这种覆盖是临时性的,不会真的修改配置文件,只对自动化接口有效:
http://127.0.0.1:35000/api/v1/profile/start?skiplock=true&profileId=xxxxxxxx-xxxx-xxxx-xxxx-xxxxxxxxxxxx&proxytype=socks5&proxyserver=ip&proxyport=1080&proxyusername=&proxypassword=
代理类型可能是这四种:
proxytype=socks5
proxytype=socks4
proxytype=http
proxytype=https
代理用户名和密码可以不传为空。
Python 案例: (刚安装 python ,先用 cmd 进 Python\Scripts 目录,运行 pip install selenium 和 pip install requests
from selenium import webdriver
from selenium.webdriver.chrome.options import Options
import requests

mla_profile_id = 'xxxxxxxx-xxxx-xxxx-xxxx-xxxxxxxxxxxx'
mla_url = 'http://127.0.0.1:35000/api/v1/profile/start?skiplock=true&profileId='+mla_profile_id

resp = requests.get(mla_url)
json = resp.json()

#判断json status 返回状态 如果是ERROR 终止进程并提示错误
errorcode='ERROR'

statuscode=json['status'] #json 返回状态

if errorcode==statuscode:
    print(json['value']) #打印错误信息
    quit() #终止程序

print(json['value'])

chrome_options = Options()
chrome_options.add_experimental_option("debuggerAddress", json['value'][7:])
chrome_driver = r"chromedriver.exe"
#http://chromedriver.storage.googleapis.com/92.0.4515.107/chromedriver_win32.zip
#下载 chromedriver 文件放到python目录
driver = webdriver.Chrome(chrome_driver, options=chrome_options)

driver.get('https://www.bing.com/')
executor_url = driver.command_executor._url
session_id = driver.session_id
print(executor_url)
print(session_id)
print('ok it is done')

driver.quit()
Python 案例: (selenium 4 版本要使用以下的代码,上面的代码 在 selenium 4 中会报错)
from selenium import webdriver
from selenium.webdriver.chrome.options import Options
import requests
from selenium.webdriver.chrome.service import Service as ChromeService
from webdriver_manager.chrome import ChromeDriverManager


mla_profile_id = 'xxxxxxxx-xxxx-xxxx-xxxx-xxxxxxxxxxxx'
mla_url = 'http://127.0.0.1:35000/api/v1/profile/start?skiplock=true&profileId='+mla_profile_id

resp = requests.get(mla_url)
json = resp.json()


#判断json status 返回状态 如果是ERROR 终止进程并提示错误
errorcode='ERROR'

statuscode=json['status'] #json 返回状态

if errorcode==statuscode:
    print(json['value']) #打印错误信息
    quit() #终止程序

print(json['value'])

chrome_options = Options()
chrome_options.add_experimental_option("debuggerAddress", json['value'][7:])

service = ChromeService(executable_path=json['chromedriver'])

driver = webdriver.Chrome( service=service ,options=chrome_options)

driver.get('https://www.bing.com/')
executor_url = driver.command_executor._url
session_id = driver.session_id
print(executor_url)
print(session_id)
print('ok it is done')

#driver.quit()
chromedriver 文件在每个内核安装目录中都有,使用 API 启动浏览器接口 /api/v1/profile/start 也会返回 chromedriver 文件全路径位置。
selenium 防检测可以在浏览器配置-》其它配置-》自定义启动浏览器参数 里设置 --disable-blink-features=AutomationControlled 会起到一定做用。
注意一下VMLogin 浏览器内核版本:
如果是86,就下载:
http://chromedriver.storage.googleapis.com/86.0.4240.22/chromedriver_win32.zip
如果是90,就下载:
http://chromedriver.storage.googleapis.com/90.0.4430.24/chromedriver_win32.zip
如果是92,就下载:
http://chromedriver.storage.googleapis.com/92.0.4515.107/chromedriver_win32.zip
chromedriver版本不对应,会造成自动化失败。
如果不能关闭浏览器,可以使用 http://127.0.0.1:35000/api/v1/profile/stop?profileId=xxxxxxxx-xxxx-xxxx-xxxx-xxxxxxxxxxxx 接口来关闭指定配置的浏览器进程。
如果你运行代码只能打开浏览器,并没有打开网站,那可能要把 chromedriver.exe 复制到你的 python 安装目录里了,还有一种可能是你选了移动仿真模式。